Day 34: Linux Kernel Module Development
Table of Contents
- Introduction to Kernel Modules
- Kernel Module Architecture
- Setting Up Development Environment
- Basic Kernel Module Structure
- Module Parameters
- Character Device Driver Example
- Debugging Kernel Modules
- Best Practices and Security
- Conclusion
1. Introduction to Kernel Modules
Loadable Kernel Modules (LKMs) are object files that contain code to extend the running kernel of an operating system. They provide a way to add functionality to the kernel without recompiling the kernel or rebooting the system.
Key Concepts
- Dynamic Loading: Modules can be loaded and unloaded at runtime, making the kernel highly flexible. This allows for system resources to be used efficiently by only loading necessary functionality when required. For example, a module for a specific hardware device can be loaded when the device is connected and unloaded when it is disconnected.
- Kernel Space Execution: Modules run in kernel space with full system privileges, which means they have direct access to hardware and kernel functions. This makes them powerful but also potentially dangerous if not properly implemented. A poorly written module can crash the entire system.
- Modular Design: The Linux kernel follows a modular design philosophy, where core functionality is separated from optional features that can be loaded as modules. This design allows the kernel to remain lightweight and efficient, while still being extensible.
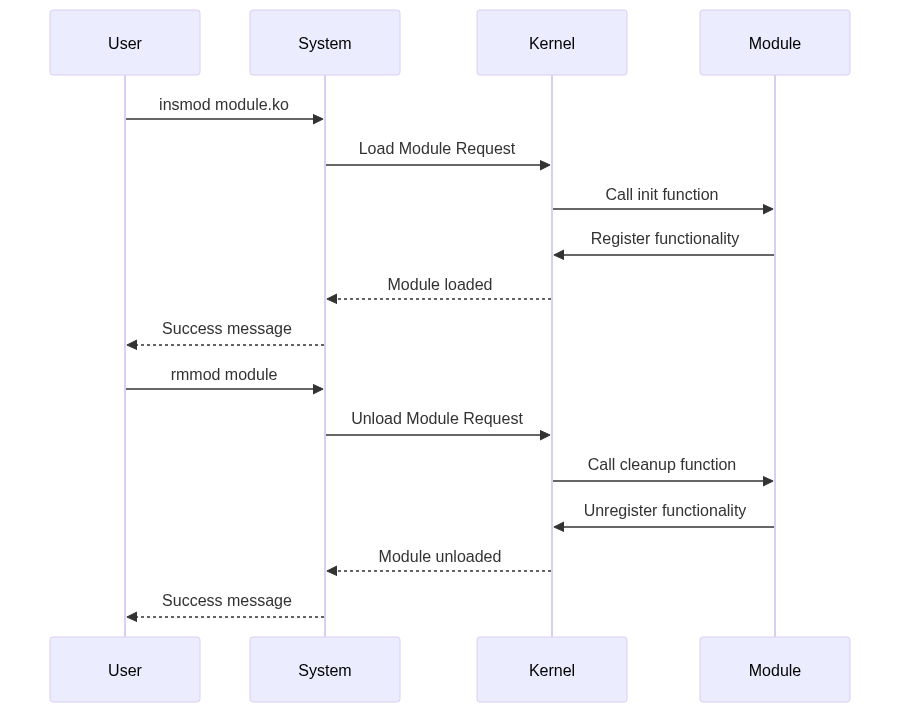
- Loading a Module: When a user loads a module using
insmod, the kernel calls the module’s initialization function, which registers the module’s functionality. - Unloading a Module: When a user unloads a module using
rmmod, the kernel calls the module’s cleanup function, which unregisters the module’s functionality.
2. Kernel Module Architecture
The architecture of kernel modules is built around several key components:
#include <linux/module.h>
#include <linux/kernel.h>
#include <linux/init.h>

MODULE_LICENSE("GPL");
MODULE_AUTHOR("Your Name");
MODULE_DESCRIPTION("Description of your module");
MODULE_VERSION("1.0");

static int __init module_init_function(void) {
    printk(KERN_INFO "Module initialized\n");
    return 0;
}

static void __exit module_exit_function(void) {
    printk(KERN_INFO "Module removed\n");
}

module_init(module_init_function);
module_exit(module_exit_function);
Core Components
- Module Entry Points: Every module must have initialization and cleanup functions. The
module_init()macro specifies the function to be called when the module is loaded, andmodule_exit()specifies the function to be called when the module is unloaded. - Module Information: The
MODULE_LICENSE,MODULE_AUTHOR,MODULE_DESCRIPTION, andMODULE_VERSIONmacros provide metadata about the module. This information is useful for documentation and debugging. - Symbol Export: Modules can export symbols (functions or variables) that can be used by other modules. This is done using the
EXPORT_SYMBOLmacro. - Module Parameters: Modules can accept parameters at load time, allowing for runtime configuration. This is done using the
module_param()macro.
3. Setting Up Development Environment
To develop kernel modules, you need to set up a proper development environment. This includes installing the necessary packages and setting up a directory structure.
Required Packages and Tools
sudo apt-get update
sudo apt-get install build-essential linux-headers-$(uname -r)
Directory Structure
module_project/
├── Makefile
├── module_main.c
└── module_utils.h
Basic Makefile
obj-m += module_name.o
module_name-objs := module_main.o module_utils.o

all:
    make -C /lib/modules/$(shell uname -r)/build M=$(PWD) modules

clean:
    make -C /lib/modules/$(shell uname -r)/build M=$(PWD) clean
- Makefile: The Makefile is used to compile the kernel module. The
obj-mvariable specifies the object files to be built as kernel modules. Themake -Ccommand invokes the kernel build system to compile the module. - Directory Structure: The
module_main.cfile contains the main code for the module, andmodule_utils.hcontains any utility functions or definitions. The Makefile is used to compile these files into a kernel module.
4. Basic Kernel Module Structure
Let’s create a complete working example of a simple “Hello, Kernel!” module.
// you can save it as hello_module.c
#include <linux/module.h>
#include <linux/kernel.h>
#include <linux/init.h>

MODULE_LICENSE("GPL");
MODULE_AUTHOR("Your Name");
MODULE_DESCRIPTION("A simple Hello World module");
MODULE_VERSION("1.0");

static int __init hello_init(void) {
    printk(KERN_INFO "Hello, Kernel!\n");
    return 0;
}

static void __exit hello_exit(void) {
    printk(KERN_INFO "Goodbye, Kernel!\n");
}

module_init(hello_init);
module_exit(hello_exit);
Explanation
- Initialization Function: The
hello_init()function is called when the module is loaded. It prints a message to the kernel log usingprintk(). - Cleanup Function: The
hello_exit()function is called when the module is unloaded. It also prints a message to the kernel log. - Module Metadata: The
MODULE_*macros provide information about the module, such as its license, author, description, and version.
Running the Code
- Save the code in a file named
hello_module.c. - Create a Makefile as shown in the previous section.
- Run
maketo compile the module. - Load the module using
sudo insmod hello_module.ko. - Check the kernel log using
dmesgto see the “Hello, Kernel!” message. - Unload the module using
sudo rmmod hello_module. - Check the kernel log again to see the “Goodbye, Kernel!” message.
5. Module Parameters
Module parameters allow you to pass configuration options to a module when it is loaded. This is useful for configuring the behavior of the module at runtime.
#include <linux/module.h>
#include <linux/moduleparam.h>

static int value = 42;
static char *name = "default";

module_param(value, int, 0644);
MODULE_PARM_DESC(value, "An integer value");
module_param(name, charp, 0644);
MODULE_PARM_DESC(name, "A character string");
Explanation
- Module Parameters: The
module_param()macro defines a parameter that can be passed to the module when it is loaded. The parameters can be of various types, such asint,charp(character pointer), etc. - Permissions: The
0644argument specifies the permissions for the parameter file in sysfs. This allows you to read and write the parameter from user space. - Parameter Description: The
MODULE_PARM_DESCmacro provides a description of the parameter, which is useful for documentation.
Running the Code
- Add the parameter definitions to your module code.
- Compile the module using
make. - Load the module with parameters:
sudo insmod hello_module.ko value=100 name="test". - Check the parameter values in
/sys/module/hello_module/parameters/.
6. Character Device Driver Example
A character device driver is a type of kernel module that allows user-space programs to interact with hardware devices. Here’s a complete example of a simple character device driver.
#include <linux/module.h>
#include <linux/kernel.h>
#include <linux/fs.h>
#include <linux/cdev.h>
#include <linux/uaccess.h>

#define DEVICE_NAME "chardev"
#define CLASS_NAME "char_class"

static int major_number;
static struct class *char_class = NULL;
static struct cdev char_cdev;

static int device_open(struct inode *inode, struct file *file) {
    printk(KERN_INFO "Device opened\n");
    return 0;
}

static int device_release(struct inode *inode, struct file *file) {
    printk(KERN_INFO "Device closed\n");
    return 0;
}

static ssize_t device_read(struct file *file, char __user *buffer,
                          size_t length, loff_t *offset) {
    char message[] = "Hello from kernel\n";
    size_t message_len = strlen(message);

    if (*offset >= message_len)
        return 0;

    if (length > message_len - *offset)
        length = message_len - *offset;

    if (copy_to_user(buffer, message + *offset, length))
        return -EFAULT;

    *offset += length;
    return length;
}

static ssize_t device_write(struct file *file, const char __user *buffer,
                           size_t length, loff_t *offset) {
    printk(KERN_INFO "Received %zu bytes\n", length);
    return length;
}

static struct file_operations fops = {
    .open = device_open,
    .release = device_release,
    .read = device_read,
    .write = device_write,
};

static int __init chardev_init(void) {
    // allocate major number
    major_number = register_chrdev(0, DEVICE_NAME, &fops);
    if (major_number < 0) {
        printk(KERN_ALERT "Failed to register major number\n");
        return major_number;
    }

    // register device class
    char_class = class_create(THIS_MODULE, CLASS_NAME);
    if (IS_ERR(char_class)) {
        unregister_chrdev(major_number, DEVICE_NAME);
        printk(KERN_ALERT "Failed to register device class\n");
        return PTR_ERR(char_class);
    }

    // register device driver
    if (IS_ERR(device_create(char_class, NULL, MKDEV(major_number, 0),
                            NULL, DEVICE_NAME))) {
        class_destroy(char_class);
        unregister_chrdev(major_number, DEVICE_NAME);
        printk(KERN_ALERT "Failed to create device\n");
        return PTR_ERR(char_class);
    }

    printk(KERN_INFO "Character device registered\n");
    return 0;
}

static void __exit chardev_exit(void) {
    device_destroy(char_class, MKDEV(major_number, 0));
    class_unregister(char_class);
    class_destroy(char_class);
    unregister_chrdev(major_number, DEVICE_NAME);
    printk(KERN_INFO "Character device unregistered\n");
}

module_init(chardev_init);
module_exit(chardev_exit);

MODULE_LICENSE("GPL");
MODULE_AUTHOR("Your Name");
MODULE_DESCRIPTION("A simple character device driver");
MODULE_VERSION("1.0");
What are we doing in the above code?
- Device Operations: The
file_operationsstructure defines the functions that handle operations like opening, reading, writing, and closing the device. - Device Registration: The
register_chrdev()function registers the character device with the kernel. Theclass_create()anddevice_create()functions create the device class and device node in/dev. - Device Cleanup: The
chardev_exit()function unregisters the device and cleans up resources when the module is unloaded.
Running the Code
- Save the code in a file named
chardev.c. - Compile the module using
make. - Load the module using
sudo insmod chardev.ko. - Check the kernel log using
dmesgto see the “Character device registered” message. - Interact with the device using a user-space program or commands like
cat /dev/chardev. - Unload the module using
sudo rmmod chardev. - Check the kernel log again to see the “Character device unregistered” message.
7. Debugging Kernel Modules
Debugging kernel modules can be challenging because they run in kernel space. However, there are several techniques you can use to debug them effectively.
printk Levels
printk(KERN_EMERG   "System is unusable\n");
printk(KERN_ALERT   "Action must be taken immediately\n");
printk(KERN_CRIT    "Critical conditions\n");
printk(KERN_ERR     "Error conditions\n");
printk(KERN_WARNING "Warning conditions\n");
printk(KERN_NOTICE  "Normal but significant\n");
printk(KERN_INFO    "Informational\n");
printk(KERN_DEBUG   "Debug-level messages\n");
Using KGDB
KGDB is a kernel debugger that allows you to debug the kernel using GDB. To use KGDB, you need to enable it in the kernel configuration and boot the kernel with the appropriate parameters.
# enable KGDB in kernel config
CONFIG_KGDB=y
CONFIG_KGDB_SERIAL_CONSOLE=y

# boot parameters
kgdboc=ttyS0,115200 kgdbwait
- printk Levels: The
printk()function allows you to log messages at different levels of severity. These messages can be viewed usingdmesg. - KGDB: KGDB allows you to debug the kernel using GDB. You can set breakpoints, inspect variables, and step through code just like you would with a user-space program.
8. Best Practices and Security
When developing kernel modules, it’s important to follow best practices to ensure reliability and security.
- Error Handling: Always check return values and handle errors gracefully. A kernel module that crashes can bring down the entire system.
- Resource Management: Free all allocated resources in the cleanup function. This includes memory, device registrations, and any other resources.
- Concurrency: Use appropriate locking mechanisms to prevent race conditions. The kernel is highly concurrent, and your module must be thread-safe.
- Security: Validate user input and check permissions. A malicious user could exploit a poorly written module to gain unauthorized access to the system.
- Documentation: Maintain clear documentation and comments. Kernel modules can be complex, and good documentation is essential for maintenance and debugging.
9. Conclusion
Kernel module development is a complex but powerful aspect of Linux system programming. This guide covered the fundamentals of creating, loading, and managing kernel modules, including character device drivers and debugging techniques. The provided examples and best practices should serve as a foundation for developing reliable kernel modules.
By following the steps outlined in this guide, you should be able to create, compile, load, and debug your own kernel modules. Remember to always test your modules thoroughly and follow best practices to ensure the stability and security of your system.